Android BLE基礎框架使用詳解
前言
研究了一段時間的藍芽使用,發現網上相關的資料比較貧乏,不像其他Android相關資料那麼齊全,基本上大部分資料都是在藍芽聯盟SIG提供的官網ofollow,noindex">https://www.bluetooth.com/zh-cn/specifications 上查詢得到,也沒有一個比較穩定好用的基礎操作框架,開發時遇到的各種問題也是非常頭疼。在此種情況下該框架應運而生,框架中包含了藍芽裝置的基礎操作功能,呼叫簡單,已通過實際專案進行驗證,並且配有一個比較好用的demo演示,下文主要講述該框架的使用方式。如果對於Android BLE還不是很瞭解,可以先看看我的這篇博文Android BLE學習筆記 ,裡面對於藍芽的基礎知識有詳細的講述。
Android BLE基礎操作框架,基於回撥,操作簡單。其中包含掃描、連線、廣播包解析、服務讀寫及通知等功能。
- 專案地址:https://github.com/xiaoyaoyou1212/BLE
-
專案引入:
compile 'com.vise.xiaoyaoyou:baseble:1.0.5'
裝置掃描
使用簡介
掃描包含三種方式,第一種方式是直接掃描所有裝置,可以設定迴圈掃描,也可以設定超時時間,掃描到的裝置可以新增到BluetoothLeDeviceStore
中統一進行處理,使用方式如下:
ViseBluetooth.getInstance().setScanTimeout(-1).startScan(new PeriodScanCallback() {
@Override
public void scanTimeout() {

}

@Override
public void onDeviceFound(BluetoothLeDevice bluetoothLeDevice) {
bluetoothLeDeviceStore.addDevice(bluetoothLeDevice);
}
});
第二種方式是掃描指定Mac地址的裝置,一般需設定超時時間,掃描到指定裝置後就停止掃描,使用方式如下:
ViseBluetooth.getInstance().setScanTimeout(5000).startScan(new PeriodMacScanCallback() {
@Override
public void scanTimeout() {

}

@Override
public void onDeviceFound(BluetoothLeDevice bluetoothLeDevice) {

}
});
第三種方式是掃描指定廣播名的裝置,同第二種方式類似,也需設定超時時間,掃描到指定裝置後也會停止掃描,使用方式如下:
ViseBluetooth.getInstance().setScanTimeout(5000).startScan(new PeriodNameScanCallback() {
@Override
public void scanTimeout() {

}

@Override
public void onDeviceFound(BluetoothLeDevice bluetoothLeDevice) {

}
});
其中掃描到的裝置資訊都統一放到BluetoothLeDevice
中,其中包含了裝置的所有信息,以下會詳細講解具體包含哪些資訊。

裝置連線
使用簡介
連線與掃描一樣也有三種方式,第一種方式是在掃描獲取裝置資訊BluetoothLeDevice
後才可使用,可設定連線超時時間,預設超時時間為10秒,使用方式如下:
ViseBluetooth.getInstance().connect(bluetoothLeDevice, false, new IConnectCallback() {
@Override
public void onConnectSuccess(BluetoothGatt gatt, int status) {

}

@Override
public void onConnectFailure(BleException exception) {

}

@Override
public void onDisconnect() {

}
});
第二種方式是連線指定Mac地址的裝置,該方式使用前不需要進行掃描,該方式直接將掃描和連線放到一起,在掃描到指定裝置後自動進行連線,使用方式如下:
ViseBluetooth.getInstance().connectByMac(mac, false, new IConnectCallback() {
@Override
public void onConnectSuccess(BluetoothGatt gatt, int status) {

}

@Override
public void onConnectFailure(BleException exception) {

}

@Override
public void onDisconnect() {

}
});
第三種方式是連線指定名稱的裝置,該方式與第二種方式類似,使用方式如下:
ViseBluetooth.getInstance().connectByName(name, false, new IConnectCallback() {
@Override
public void onConnectSuccess(BluetoothGatt gatt, int status) {

}

@Override
public void onConnectFailure(BleException exception) {

}

@Override
public void onDisconnect() {

}
});
連線成功後就可以進行相關處理,回撥已在底層做了執行緒切換處理,可以直接操作檢視。如果知道該裝置服務的UUID,可直接呼叫ViseBluetooth.getInstance().withUUIDString(serviceUUID, characteristicUUID, descriptorUUID);
,那麼在下面操作裝置時就不需要傳特徵(BluetoothGattCharacteristic
)和描述(BluetoothGattDescriptor
)相關引數,如果在連線成功後一直沒設定UUID,那麼在操作時則需要傳該引數,該內容在下文的裝置操作中會詳細講解,此處就不一一講解了。
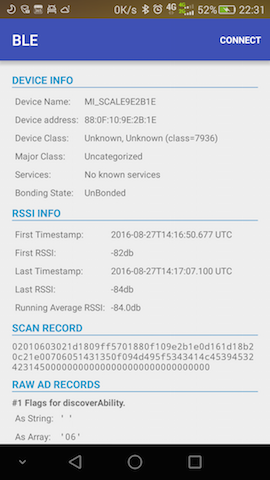
裝置詳情
使用簡介
DEVICE INFO(裝置資訊)
bluetoothLeDevice.getName()
bluetoothLeDevice.getAddress()
bluetoothLeDevice.getBluetoothDeviceClassName()
bluetoothLeDevice.getBluetoothDeviceMajorClassName()
bluetoothLeDevice.getBluetoothDeviceKnownSupportedServices()
bluetoothLeDevice.getBluetoothDeviceBondState()
RSSI INFO(訊號資訊)
bluetoothLeDevice.getFirstTimestamp()
bluetoothLeDevice.getFirstRssi()
bluetoothLeDevice.getTimestamp()
bluetoothLeDevice.getRssi()
bluetoothLeDevice.getRunningAverageRssi()
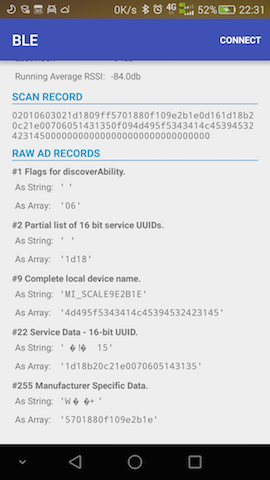
SCAN RECORD INFO(廣播資訊)
根據掃描到的廣播包AdRecordStore
獲取某個廣播資料單元AdRecord
的型別編號record.getType()
,再根據編號獲取廣播資料單元的型別描述record.getHumanReadableType()
以及該廣播資料單元的長度及資料內容,最後通過AdRecordUtil.getRecordDataAsString(record)
將資料內容轉換成具體字串。
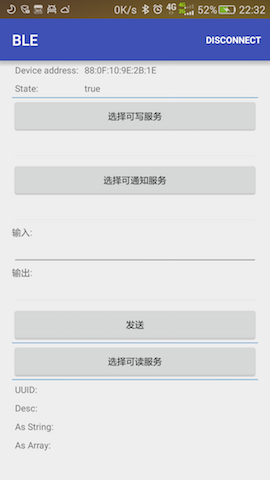
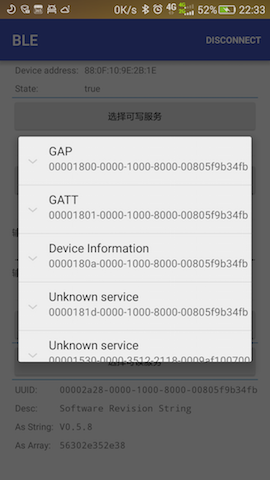
裝置操作
使用簡介
在操作裝置前首先要保證裝置已連線成功,那麼在裝置連線成功獲取到BluetoothGatt
後直接對服務的特徵值UUID進行相關處理,其中特徵值UUID有可讀、可寫、可通知、指示器四種,獲取過程如下所示:
final String unknownServiceString = getResources().getString(R.string.unknown_service);
final String unknownCharaString = getResources().getString(R.string.unknown_characteristic);
final List<Map<String, String>> gattServiceData = new ArrayList<>();
final List<List<Map<String, String>>> gattCharacteristicData = new ArrayList<>();
mGattCharacteristics = new ArrayList<>();

// Loops through available GATT Services.
for (final BluetoothGattService gattService : gattServices) {
final Map<String, String> currentServiceData = new HashMap<>();
uuid = gattService.getUuid().toString();
currentServiceData.put(LIST_NAME, GattAttributeResolver.getAttributeName(uuid, unknownServiceString));
currentServiceData.put(LIST_UUID, uuid);
gattServiceData.add(currentServiceData);

final List<Map<String, String>> gattCharacteristicGroupData = new ArrayList<>();
final List<BluetoothGattCharacteristic> gattCharacteristics = gattService.getCharacteristics();
final List<BluetoothGattCharacteristic> charas = new ArrayList<>();

// Loops through available Characteristics.
for (final BluetoothGattCharacteristic gattCharacteristic : gattCharacteristics) {
charas.add(gattCharacteristic);
final Map<String, String> currentCharaData = new HashMap<>();
uuid = gattCharacteristic.getUuid().toString();
currentCharaData.put(LIST_NAME, GattAttributeResolver.getAttributeName(uuid, unknownCharaString));
currentCharaData.put(LIST_UUID, uuid);
gattCharacteristicGroupData.add(currentCharaData);
}

mGattCharacteristics.add(charas);
gattCharacteristicData.add(gattCharacteristicGroupData);
}
在獲取到BluetoothGattCharacteristic
後可進行如下操作:
- 設定通知服務
ViseBluetooth.getInstance().enableCharacteristicNotification(characteristic, new IBleCallback<BluetoothGattCharacteristic>() {
@Override
public void onSuccess(BluetoothGattCharacteristic bluetoothGattCharacteristic, int type) {

}

@Override
public void onFailure(BleException exception) {

}
}, false);
其中最後一個引數是設定該通知是否是指示器方式,指示器方式為有應答的通知方式,在傳輸時更為靠譜。如果在連線成功時已經知道該裝置可通知的UUID並且已經設定成功,那麼此處還可以如下設定:
ViseBluetooth.getInstance().enableCharacteristicNotification(new IBleCallback<BluetoothGattCharacteristic>() {
@Override
public void onSuccess(BluetoothGattCharacteristic bluetoothGattCharacteristic, int type) {

}

@Override
public void onFailure(BleException exception) {

}
}, false);
- 讀取資訊
ViseBluetooth.getInstance().readCharacteristic(characteristic, new IBleCallback<BluetoothGattCharacteristic>() {
@Override
public void onSuccess(BluetoothGattCharacteristic bluetoothGattCharacteristic, int type) {

}

@Override
public void onFailure(BleException exception) {

}
});
同上,如果已設定過可讀的UUID,那麼此處也可以通過如下方式讀取資訊:
ViseBluetooth.getInstance().readCharacteristic(new IBleCallback<BluetoothGattCharacteristic>() {
@Override
public void onSuccess(BluetoothGattCharacteristic bluetoothGattCharacteristic, int type) {

}

@Override
public void onFailure(BleException exception) {

}
});
- 寫入資料
ViseBluetooth.getInstance().writeCharacteristic(characteristic, new byte[]{0x00,0x01,0x02}, new IBleCallback<BluetoothGattCharacteristic>() {
@Override
public void onSuccess(BluetoothGattCharacteristic bluetoothGattCharacteristic, int type) {

}

@Override
public void onFailure(BleException exception) {

}
});
同樣,如果在連線成功時設定過可寫UUID,那麼此處也可以通過如下方式寫入資料:
ViseBluetooth.getInstance().writeCharacteristic(new byte[]{0x00,0x01,0x02}, new IBleCallback<BluetoothGattCharacteristic>() {
@Override
public void onSuccess(BluetoothGattCharacteristic bluetoothGattCharacteristic, int type) {

}

@Override
public void onFailure(BleException exception) {

}
});
此處的資料new byte[]{0x00,0x01,0x02}
為模擬資料,在使用時替換為真實資料即可,切記每次傳送的資料必須在20個位元組內,如果大於20位元組可採用分包機制進行處理。
從以上的描述中可以知道,裝置相關的所有操作都統一交給ViseBluetooth
進行處理,並且該類是單例模式,全域性只有一個,管理很方便。使用前必須要在Application中呼叫ViseBluetooth.getInstance().init(this);
進行初始化,在連線裝置成功時會自動獲得一個BluetoothGatt
,在斷開連線時會將該BluetoothGatt
關閉,上層不用關心連線數最大為6的限制問題,只需要在需要釋放資源時呼叫ViseBluetooth.getInstance().clear();
就行,簡單易用,這也正是該專案的宗旨。
在此要感謝兩位作者提供的開源庫https://github.com/litesuits/android-lite-bluetoothLE 和https://github.com/alt236/Bluetooth-LE-Library—Android ,這兩個開源庫對於本專案的完成提供了很大的幫助。